[en] Edit components
[en] When you open a component in the NGE, it will always open in Read-only mode. In order to start editing a component, you need to set the component to Edit mode, after which you can edit as usual.
[en] When you open a component in the Next-gen editor it will open in view mode. In order to start editing it, you have to set it to edit mode.
Anmerkung
[en] By default, Autosave will be enabled for all users. If users decide to turn off Autosave, that setting will be remembered by the Next-gen editor.
[en] Select the Edit/Close edit button
 .
.Anmerkung
[en] Make sure you are in Edit mode, and not suggestion mode by using the Mode switcher
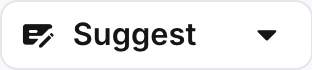 .
.[en] Once you are done with your edits, select the Edit/Close edit button again
 .
.Anmerkung
[en] If you have unsaved changes in your document, you will get a save warning when exiting edit mode.
[en] Blank topics by default start with an empty title element and an empty para element. There are several ways to insert new elements into a component:
[en] using the Enter key (
paraonly) and converting[en] using the Insert menu
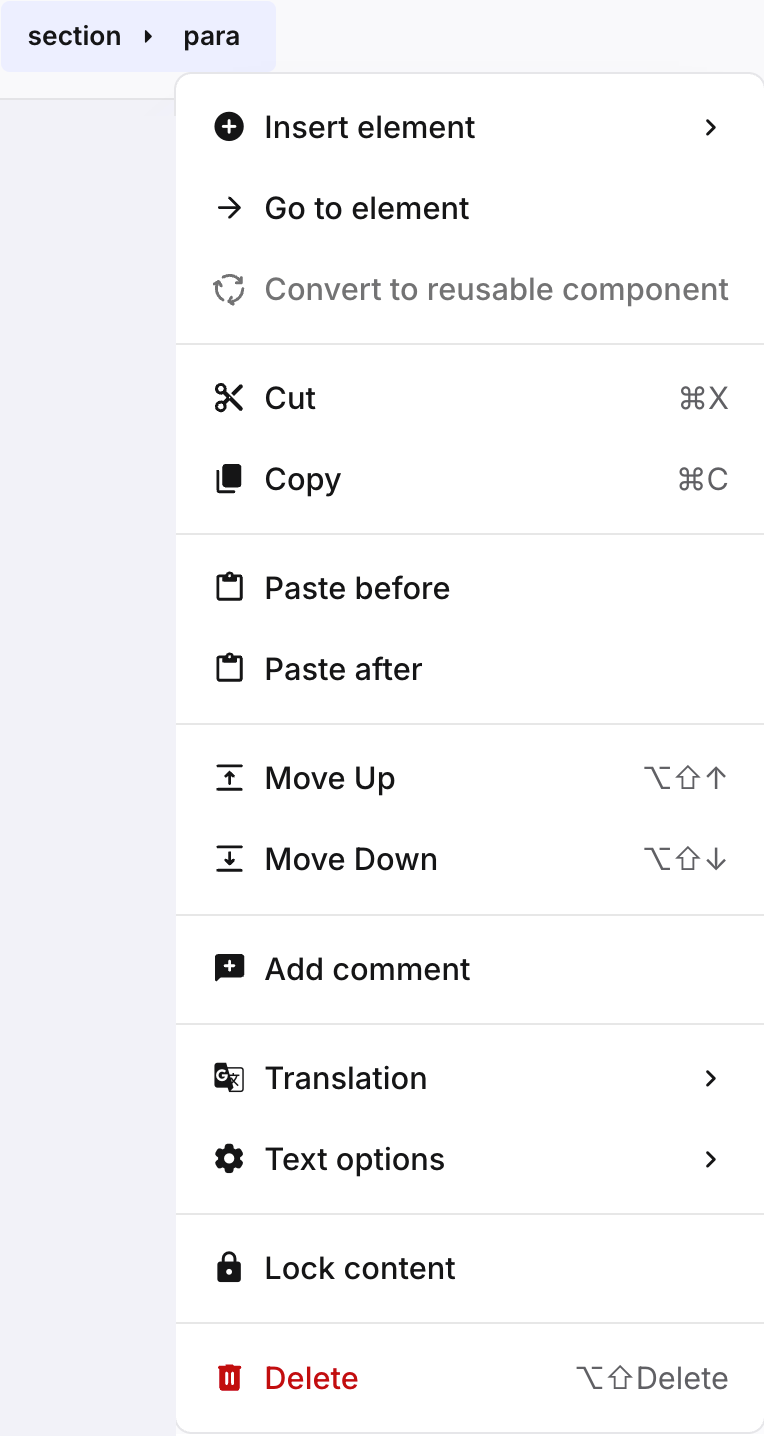
[en] using the Element structure menu
[en] using the Insert paragraph button
[en] Insert element using Enter
[en] In most cases, pressing Enter inside an element will produce a new paragraph (an exception to this is list items, in which case pressing Enter will result in a new list item or procedure step; see [en] Lists). You can then convert that paragraph to other valid elements (see [en] Convert an element).
[en] Place your cursor at the end of an element.
[en] Press Enter.
[en] With the cursor inside the new paragraph, either use the Element insert menu or the Element context menu to convert the paragraph to another valid element.
[en] Insert paragraph before or after block elements
[en] In cases where it is not possible to put your cursor at the end of the element in order to insert a new element (i.e. block elements such as images, tables and reused components), the Next-gen editor provides buttons at the top and bottom of the element to insert an empty paragraph before or after the element, respectively.
Anmerkung
[en] You can also right-click on block elements, then select Insert before or Insert after.
[en] To insert an empty paragraph after a block element:
[en] Hover over the element you want to place an element after.
[en] Select the Insert paragraph button
 , either at the top or the bottom of the element. A new paragraph will be created.
Anmerkung
[en] The newly created paragraph can be converted to another element if you need a different element. Please see [en] Convert an element for more information on converting elements.
[en] Insert elements using the Insert menu
[en] You can use the Insert menu to insert valid elements into your component.
[en] Place your cursor at the end of an element or inside an empty paragraph.
Anmerkung
[en] Selecting a block element (e.g. table or image) when the cursor is placed inside an empty paragraph, will convert that paragraph to the chosen element.
[en] Choose a valid element from the insert menu.

Anmerkung
[en] Invalid elements will be greyed out and can not be chosen at your current cursor position.
Anmerkung
[en] The Insert menu contains both block- and inline elements. When choosing an inline element (such as Variable, or Inline image), the new element will be placed inline rather than a new block element being created.
[en] Insert element using the Element structure menu
[en] The Element structure menu lets you insert elements before or after your currently selected element.
[en] Place your cursor inside an element before or after which you want to insert a new element.
[en] Select the element in the Element structure menu.
Anmerkung
[en] Depending on the element chosen, as well as on which new element you want to insert, you may have to select the parent element of the currently chosen element. For example, if you have a procedure and you want to insert a step after the current step, you have to select the step element, rather than the para element of that step.
[en] Select Insert element > Insert before/after.
Anmerkung
[en] You can also choose Insert at beginning or Insert at the end, but this will place the (inline) element inside the current element, rather than creating an entirely new element.
[en] Select a valid element you want to insert.
[en] Inserting components (both topics, as well as informal topics) works in much the same way as inserting other (block) elements.
[en] Place your cursor at the end of a paragraph, or inside an empty paragraph. Create a new paragraph if necessary.
Anmerkung
[en] Inserting a component with your cursor placed inside an existing paragraph (i.e. not at the beginning or end of the paragraph) will result in the existing paragraph being split into two separate ones, with the inserted component in between.
[en] Select the Element insert menu, then select Component.
Anmerkung
[en] When reusing informal topics as parts of lists and procedures (see Eine Sequenz von Listenelementen wiederverwenden), the reused topic needs to be placed before or after the step element. For more information, please see [en] Lists).
[en] Reused component options
[en] You can manage reused components inside topics by accessing the More options menu at the top right of the reused element.
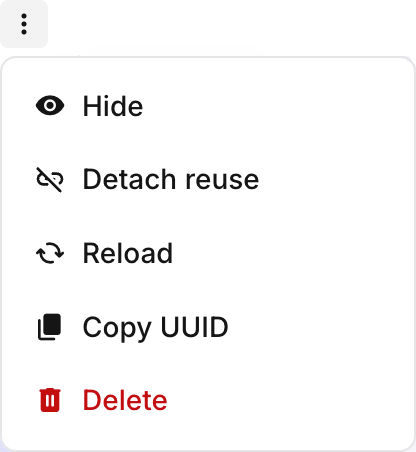 |
[en] Here you can do the following:
[en] Hide/Show: toggles the accordion to hide or show the reused component's contents.
[en] Detach reuse: converts the reused component into a regular section and severs the link to the original component.
[en] Reload: reloads the reused component (e.g. when you've altered the reused component in another browser tab.
[en] Copy UUID: copies the reused component's UUID to the clipboard.
[en] Delete: deletes the reused component from the topic.
[en] Insert a reusable text fragment
[en] Every paragraph (or other textual block element, such as titles and captions) that you write in Paligo is stored in the database and is available for reuse. Reusable paragraphs are also known as reusable text fragments. By reusing paragraphs, you can save time with content creation and updating and make your content more consistent.
[en] For information on how to insert reusable text fragments, see Wiederverwendbares Textfragment einfügen.
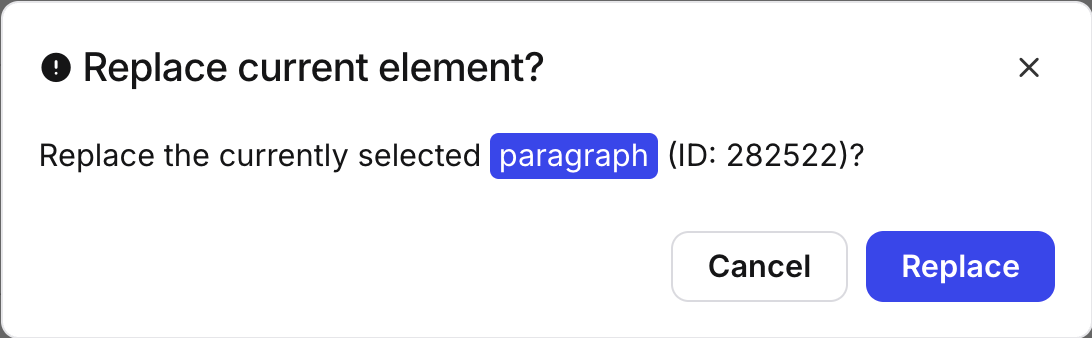
[en] When inserting reusable text fragments it is important to set the insertion point (cursor) inside an empty paragraph or list item. If the element is not empty, you will be asked if you wish to replace the current element with the text fragment you are trying to insert.
 |
[en] Inserting inline elements is done in much the same way as it was before.
[en] Place your cursor where you want to insert the inline element or select the text you want to apply the element to.
[en] Choose the inline element by:
[en] Selecting the Insert menu and choosing from there.
[en] Using the Element context menu (Alt + Enter ⏎ (Windows) or Command ⌘ + Enter ⏎ (Mac))
[en] Empty paragraphs can easily be converted to other types of elements.
[en] Create an empty paragraph.
[en] With the cursor inside the paragraph, select the Element insert menu, then choose the element you want to convert it to (e.g. a table).
Anmerkung
[en] To convert a paragraph to a list (ordered, unordered, procedure etc.), select the appropriate button in the toolbar.
Anmerkung
[en] Note that lists can also be converted from one type to another by placing the cursor inside the list or nested list and selecting the button in the toolbar for the list type you want to convert to.
[en] The Advanced View gives you additional editing options by replacing the standard system-related right-click menu with Paligo's own context menu. It is intended for authoring complex DocBook structures and is recommended for users who are familiar with DocBook syntax.
[en] To enable Advanced View:
[en] In the Menubar, select View.
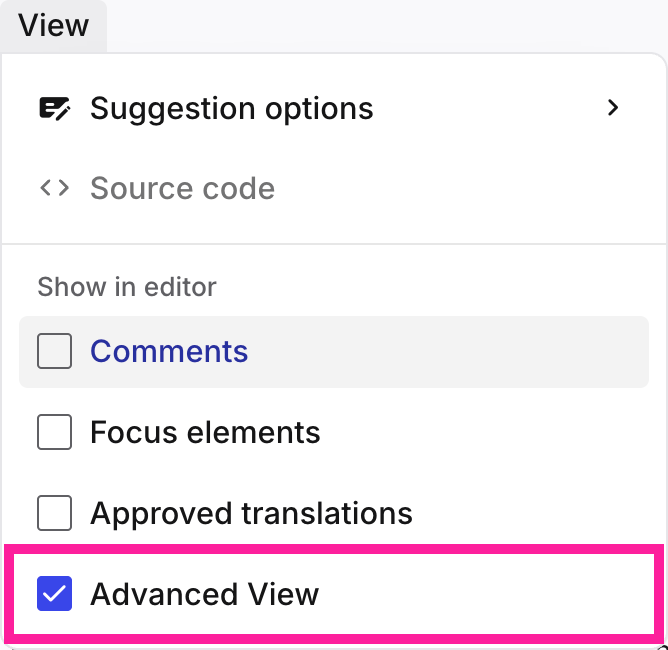
[en] Select Advanced View
[en] Check the box to enable Advanced View.
[en] Clear the box to revert to the regular (system) context menu.