Create a Table
This topic describes how to create a table via the Toolbar.
Tip
You can also create a default table by adding the table element or informaltable element from the element context menu.
Select the topic or component in the Content Manager to open it in the Editor.
Alternatively, you can Create a Topic and edit that.
Position the cursor at a valid position for a table.
Select the Insert tab in the Toolbar.

Select Table to display a menu.

Select Insert table to display the table wizard.
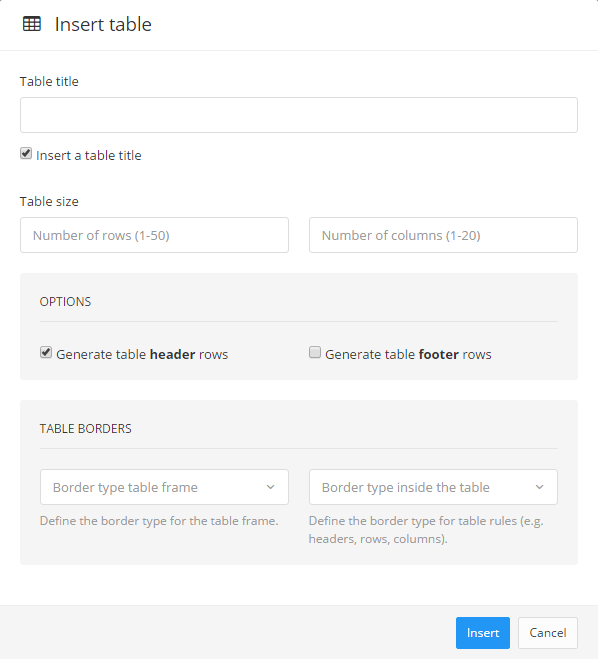
Use the table wizard to design the table. You can set:
Table title
To give the table a title that will appear above the title, check the Insert a table title box. Enter the text for the title in the Table title field.
To have a table without a title, clear the Insert a table title box.
Note
Paligo adds:
Tables with a title as table elements.
Tables without a title as
informaltableelements.
Table size
Enter the number of rows in the left field and the number of columns in the right field.
Generate table header rows
If you want the table to have a header row, where you can enter a label for each column, check the box. If you want a table with no header, clear the box.
Generate table footer rows
If you want the table to have a footer row at the bottom, check the box. If you want a table with no footer, clear the box.
Table border (frame)
Set the type of border for the outside edge of the table. Choose from:
Table border (rules)
Set the type of border for the cells inside the table. Choose from:
Select Insert.
Paligo adds the table to the topic.
Select Save.

Tip
If you need to change a table that you have created, see Display Table Settings.